It’s Planksgiving Month for the TITLE Fam! We love seeing all the super creative Plank pictures, because at TITLE we believe that plank exercise is a very beneficial core exercise all around – it strengths your abs, shoulders, glutes and the list goes on.
To help you understand the importance of a plank, Anne Wilkins, TITLE Sr. Director of Learning and Development and NASM Certified Personal Trainer, explains the benefits of planks and tips on how to perform it correctly!
_________________________________________________
The Benefits of Plank Exercise
“During my years as a fitness professional I’ve continued to see people do crunches wrong or poorly. Most people don’t engage the correct muscles, don’t breath the correct way, and don’t see results. I’ve had to focus a lot of time on helping women work their core withOUT crunches, which is where a lot of these exercises were taken from. Not just because crunches are counterintuitive and not recommended for pregnancy, but also because doing crunches (especially the wrong way) can make this ab separation worse and cause them to continue to look pregnant, i.e. the “mummy tummy.”
If you choose to do our planksgiving workouts, please take breaks as often as you need to and follow along on for appropriate modifications.
Things to remember as you start your planking adventure: You have to focus on pulling your navel to your spine and closing your rib cage as you do them, breathing in through your nose and out through your mouth, and overall making the exercise look good (that means using good form), so that you can see the results you want. Combining core exercises with cardio exercises is also key. If you don’t do cardio and burn the fat, you’ll never see your abs.
This is a core centric workout. Your core is not just your abs. It’s essentially from your breast bone to your hip bones and everything all around. When you are in plank, we want you to not only tighten your abs by pulling your navel to your spine and closing your rib cage, but we want you to squeeze your glutes, contract your pelvic floor, and bring your shoulder blades closer together. I know – so much to think about, but if you do it, you will be working so many more muscles (which means better results)!
Here are the descriptions of the “Perfect the Plank” exercises and modifications (M):
Plank: Your position should be that of the top of a push up. Shoulders are directly over hands. Feet are shoulder width apart. Back is straight and long. Pull your navel to your spine so that your low back does not sink. If you are struggling to hold this position, take your legs farther apart to create a wider base of support. M: Besides taking your legs wider, you can also just bring your knees to the floor.
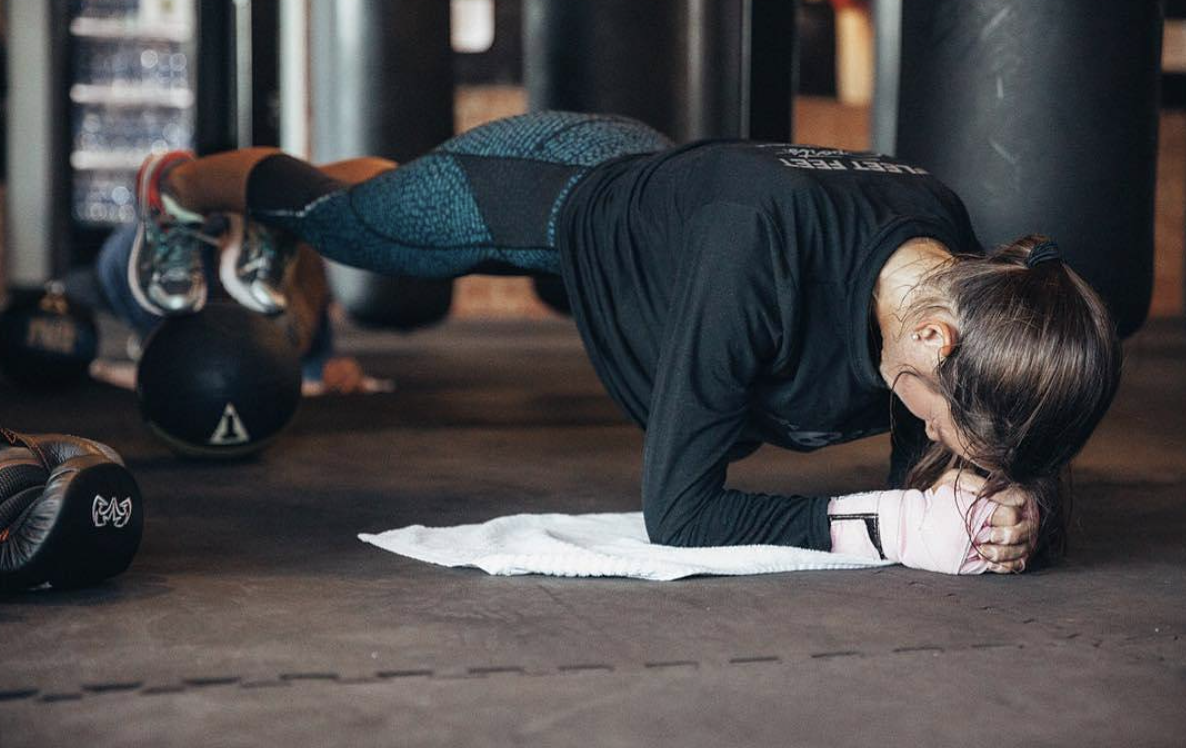
Single Leg Plank: From plank position, pull one knee into your chest and hold. M: Put your supporting knee on the ground.
Jack ‘N Plank: From plank position, soften your knees (like a jumping jack) and pull your feet together, so that your feet and legs touch, including (and especially) inner thighs. Soften your knees again and jump your legs back out. Repeat. M: Begin with feet together and alternate tapping one foot out to each side. If needed, you can also tap your knees down and rest for a moment after each rep.
Pigeon ‘N Plank: From plank position, alternate bringing one foot forward at a time so that your right foot touches your left wrist and then your left foot touches your right wrist. Try to keep your hips square to the floor the entire time. M: This takes some flexibility, so you can always just tap your foot half way up. If needed, you can also tap your knees down and rest for a moment after each rep.
Cross ‘N Plank: From plank position, alternate reaching your foot all the way through to the outside of your hands. In this variation, allow your hips to rotate so that you can bring your leg all the way through. M: If needed, you can tap your knees down and rest for a moment after each rep.
Squat ‘N Plank: From plank position, jump your feet into a sumo squat position. Keep your chest lifted as much as possible. Then jump your feet back to plank. M: Walk your feet into your squat one foot at a time and back out to plank one foot a time. You can also do this from a plank position on the knees.
Reaching Plank: From plank position, reach opposite arm and leg out at the same time. Hold for 15 seconds before repeating on the other side. M: You can perform the exercise with the knees on the floor, and just lift one limb at a time.”
_________________________________________________
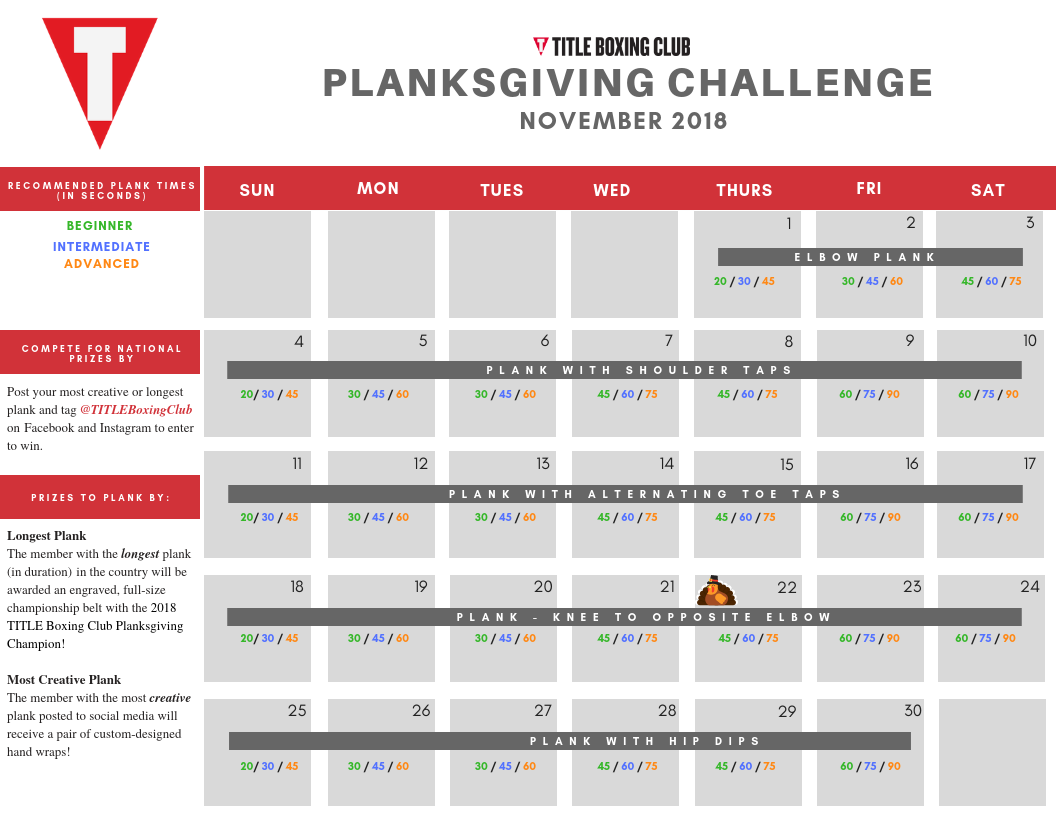
This year’s Planksgiving Challenge is focused on building endurance and strength through good form and daily progress. If you’re ready to plank with us, follow along with the calendar below.